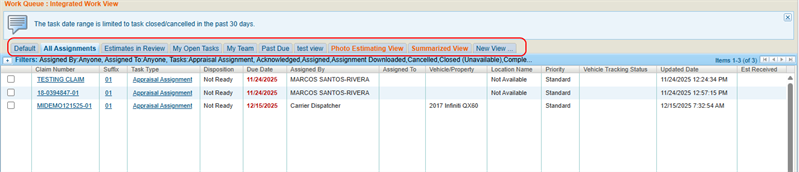
Integrated Work View
The Integrated Work View is a customizable dashboard displaying work items from across WorkCenter. Each Work View is a list of items whose display is customized through the use of filters. You can:
-
Create and save multiple views
-
Set a default view that appears when you open the page
-
Filter to show specific tasks (like open items)
-
Configure and sort visible columns
Your filter selections persist between sessions.
How to
- On the Work Queue menu in the navigation bar, select Tasks to open the Integrated Work View page.
- Select a tab to view the items in that work view.

You can change the filters on an existing work view to change the work items that are displayed.
-
On the Work Queue menu in the navigation bar, select Tasks to open the Integrated Work View page.
- Select a tab.
- Select
 Filters to expand the filter view.

- Modify filters as desired.
-
Select Save & Apply.
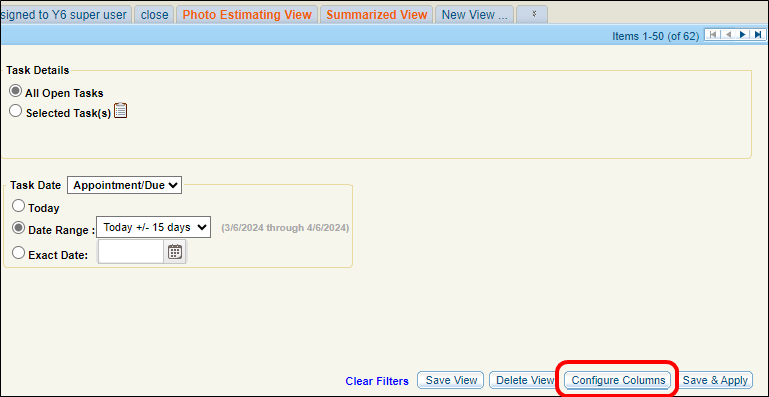
You can customize which columns appear in your work view to show only the information you need.
-
In the Filters section of the appropriate tab, select Configure Columns.
- Do one of the following in the Configure Columns window:
- To add a column, select a column title from the Available Columns list and select Add to add it to the Selected Columns list.
- To remove a column, select a column title from the Selected Columns list and select Remove.
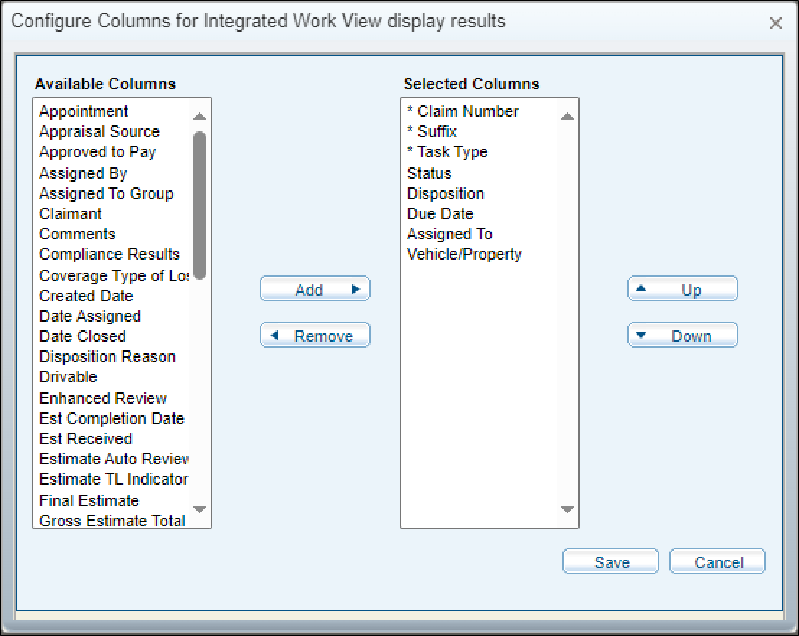
Note: The Selected Columns list shows the current column order.
- Select Up or Down to change the order of the columns shown.
Tip: The top of the list indicates the leftmost column.
-
Select Save.
-
On the Work Queue menu in the navigation bar, select Tasks to open the Integrated Work View page.
-
Select the New View tab.

-
Use filters to choose the items you want to be displayed in the work view list.
Note: If you cannot see the filter options, select
to expand the Filter section. -
Select Configure Columns to choose which columns are shown in the list and in what order they appear.
-
Enter a name for the view.
-
Select Save New View.
Go to the Summarized View tab to create a streamlined version of any one of your work views. The summarized view shows only the columns from the work view that you select, allowing you to view the most important information at a glance.
-
From the Integrated Work View page, select the Summarized View tab.
-
Select
Filters.
-
Select the work view you want to summarize from the View Name list.
- Do one of the following in the Attributes to group by section:
- To add a column to the summary, select a column title from the Available Columns list and select Add to add it to the Selected Columns list.
- To remove a column, select a column title from the Selected Columns list and select Remove.
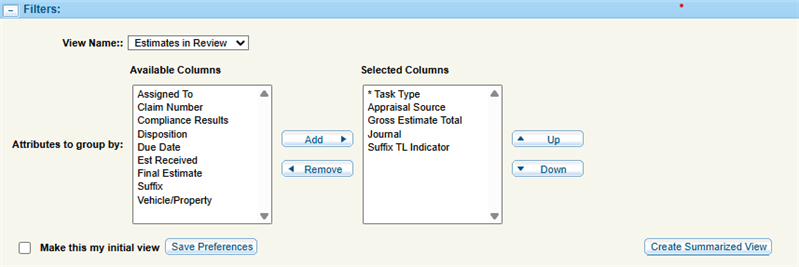
Note: Default columns are shown with an (*). You can select up to five columns (including the defaults) to be shown in the summarized view.
- Select Up or Down to change the order of the columns shown in the summarized view.
Tip: The top of the list indicates the leftmost column.
-
Select Create Summarized View.

The Count column shows the number of work items that fit the criteria you entered when creating your summarized view.
Reference
| Name | Description |
|---|---|
| Claim Number | The Claim number. |
| Suffix | The subcategory or segment within the Claim Number. |
| Task Type | The type of, or the task associated with the, assignment. |
| Status |
The status of the assignment. |
| Disposition | The status of the estimate. |
| Due Date |
The date the assignment task should be completed. |
| Assigned To | The user the task is assigned to. |
| Vehicle/Property | The year, make, and model of the vehicle or the property involved. |
| Created Date | Date task was created. |
| Updated Date | Date task was updated. |
| Location Name | Where the vehicle is located. |
| Name | Description |
|---|---|
| Claim Number | The Claim number. |
| License Plate | The license plate information. |
| Assigned By | Select to filter by who assigned the work. Select Anyone, or select Resources to Use Resource Lookup to Select a Resource. |
| Assigned To |
Select to filter by the person assigned to the work. |
| Managed By | For Repair or Rework assignments only, select to filter by the resource who manages the assignment. |
| View Name |
Enter a name for the view. |
| Make this my initial view | Select the check box to make this view the default view. |
| Task Details | Select All Open Tasks, or Selected Task(s). Select  to select the tasks you want to view. The tasks you have selected display in a list in the Task Details section. to select the tasks you want to view. The tasks you have selected display in a list in the Task Details section. |
| Task Date | Select Appointment/Due, Appointment, or Due from the list, then select Today, an Exact Date, or a Date Range. |