Manage and Transfer Invoice Information from the Payables Accounting Page
Use the Payables Accounting page to manage and transfer cost invoices to your accounting system.
How to
-
On the navigation pane, select Accounting.
-
On the Accounting page, select Payables.
-
On the navigation pane, select Accounting.
-
On the Accounting page, select Payables.
-
On the Payables page, select Date, and then select Invoice.
-
Use the calendars to select a date span for the invoices, and then select Apply.
-
Select All in the Date list to clear the filter.
Filter invoices on the Accounting page by status.
-
In the navigation pane, click Accounting.
-
On the Accounting page, select Payables.
-
Select one of the Filter By list:
-
Paid
-
Credit
-
Closed
-
Transferred
-
Not Transferred
-
Voided
-
Select All in the Filter By list to clear the filter.
-
In the navigation pane, select Accounting.
-
On the Accounting page, select Payables.
-
On the Accounting page, select the arrow next to Created In.
-
In the Created In list, select one of the following:
-
30 Days
-
60 Days
-
90 Days
-
Select All Dates in the Created In list to clear the filter.
Search for invoices by RO (Repair Order) number, invoice number, or vendor supplier. The Accounting page limits your view to your search criteria.
-
On the navigation pane, click Accounting.
-
On the Accounting page, select Payables.
-
On the page, enter your search criteria in the Search box.
-
Click
 .
. -
Click Cancel to clear your search.
Open a Repair Order from an invoice on the Accounting page.
-
On the navigation pane, select Accounting.
-
On the Accounting page, select Payables.
-
On the Accounting list, select Invoice. The repair order opens to the Parts Management page.
-
Select Accounting in the navigation pane if you want to return to the Accounting list.
Transfer invoices for repair orders to your accounting system.
-
On the navigation pane, select Accounting.
-
On the Accounting page, select Payables.
-
Filter the Payables List page as needed.
-
On the Payables page, do one of the following:
-
Select the check box for the invoice you want to transfer.
-
Select the check box at the top of the Payables page to transfer all invoices shown in the Payables page. If you filtered your list, Select All only selects visible Invoices.
-
To mark invoices as transferred, select Mark as Transferred if there is an invoice you don't want transferred. Select
 next to the invoice you want to mark, and then select Mark as Transferred. Mark as Transferred indicates the invoice was already recorded manually and does not need to be transferred or it does not need to be recorded at all.
 Tip: If you want to change an invoice from transferred to not transferred, Select
next to the job you want to mark, and then click Mark as Not Transferred. Tip: As a best practice, leave the invoice in Payables until it is successfully transferred or manually entered.
-
Select Transfer.
-
On the Confirm Transfer Details window, select one of the following in the Post Date list:
-
Use Invoice Date: Use the invoice date listed for the current invoice.
-
Use Date Below: Use the date entered in the Date field as the invoice date. Select the calendar icon
 in the Date field to adjust the date as needed.
-
Select Transfer.
Note: Mitchell Cloud Repair provides an error window with a list of invoices that did not transfer.
-
Select Done when the transfer is complete.
Print the Accounting page to provide other users in the shop with a printed copy of available invoices. You can print out the list or save a PDF.
-
On the navigation pane, click Accounting.
-
Select Payables.
-
Apply filters on the Payables page as needed.
-
Select Print List.
-
In the Print Preview window, do one of the following:
-
In the Destination list, select See more, select a printer, and then click Print.
-
In the Destination list, select Save as PDF, and then click Save.
Change invoice information on the Invoice Field from the Accounting Payables page. This allows you correct any final errors with the invoice# before transferring the invoice to your accounting software.
Reference
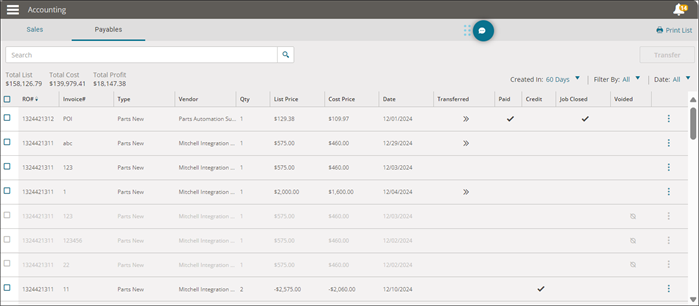
| Column | Description |
|---|---|
| RO# | Repair Order number. |
| Invoice# | Invoice Number |
| Type | Parts type: Parts New for new parts or Parts Other. |
| Vendor Name | Vendor name listed on the invoice. |
| QTY | Number of parts including received or returned parts. |
| List Price | The total list price the vendor listed as it appears on the invoice. |
| Cost Price | The total shop cost of the parts as it appears on the invoice. |
| Date | Invoice date. |
| Transferred | Chevrons icon appears if the invoice was transferred to your accounting system: >> |
| Paid | Check mark appears if the invoice was paid for. |
| Credit | Check mark appears when the invoice is a credit invoice. |
| Job Close | Check mark appears if the job related to the invoice was closed. |
| Voided | Void icon  appears in this column if the invoice was voided. appears in this column if the invoice was voided. |