Manage Labor Scrubber Settings
Labor Scrubber Settings allow Production Managers to create rules that automatically reclassify labor procedures. Use them when procedures are named, spelled, or punctuated differently in Mitchell Cloud Repair versus your estimating system. You can create scrubber lines for each variation.
Scrubbed labor lines are automatically reclassified with each job. This saves time and ensures consistency.
Note: Only add an operation to the labor scrubber if technicians always perform it in the selected labor type category. The labor type category determines which sales account the labor is posted to in your accounting software.
Note: Labor Scrubber settings are configured on the Repair Preferences page and are not available to all users.
 Additional Details
Example 1:
In your estimating program, the labor for Cover Car is classified as Paint labor. In Mitchell Cloud Repair, it's classified as Paint labor, but you want it classified as Body. Add Cover Car to the labor scrubber so that the category is automatically updated from Paint to Body whenever an estimate that includes Cover Car is imported.
Note: Add labor to the scrubber only when it is always performed by the technicians in the category you're adding it to.
Example 2:
Estimate Program A may write car cover as Cover Car while Estimate Program B writes it as COVERCAR. In this case, create two scrubber lines: one with Cover Car as the description and the other with COVERCAR.
Note: Avoid adding lines that have identical names but different labor categories. This creates confusion in Mitchell Cloud Repair when a job with scrubbed labor lines is worked on.
All scrubbed procedures must be entered in your estimating program exactly the same way as in the settings of Mitchell Cloud Repair or the scrubber fails to reclassify the procedure. To ensure consistency, we recommend placing lines in the scrubber by copying the description directly from the estimate line.
How to
Add Labor to the Labor Scrubber
-
On the navigation pane, click Settings.
-
On the Settings page, under the Repair section, click Repair Preferences.
-
On the Repair Preferences page, click the Scrubbers tab.
-
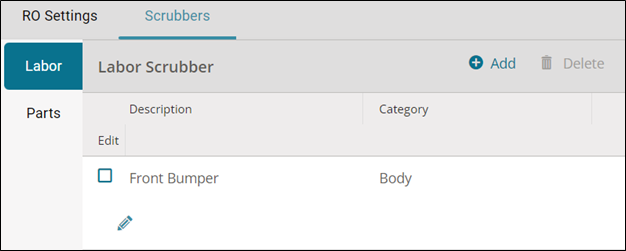
Click the Labor tab.
-
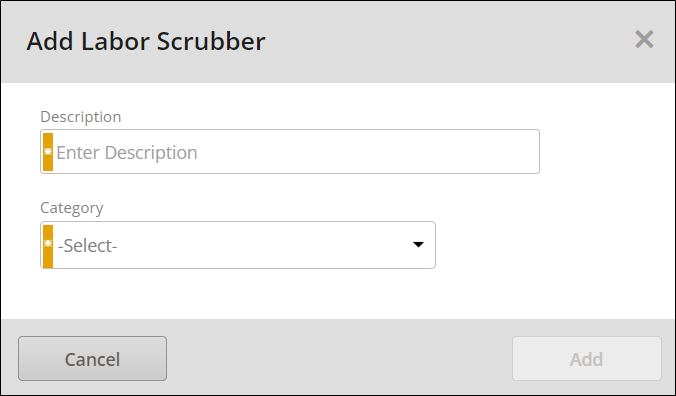
Click Add.
-
Enter the part description in the Description field.
Note: Avoid adding labor that has identical names but different types of statuses.
-
Select the part category in the Category list.
-
Click Add.
Add Labor to Labor Scrubber List from a Job on the Repair Lines Page
-
On the Job Overview page, select the Repair Plan card.
-
Select the Repair Lines tab if not already selected.
-
Select
 next to the repair line you want to add to the scrubber. You can select individual repair lines or Total Additional Operation lines.
 -
Select Add Labor to Scrubber.
-
Select the labor category in the Category list.
-
Select Add.
-
To make additional changes, select Settings in the navigation pane, select the Scrubbers tab, select the Labor tab, and then select the pencil icon next to the labor you want to change.
Modify Labor on the Labor Scrubber
-
On the navigation pane, click Settings.
-
On the Settings page, under the Repair section, click Repair Preferences.
-
On the Repair Preferences page, click the Scrubbers tab.
-
Click the Labor tab.
-
Click
 under the edit column next to the labor you want to modify.
 -
Do any of the following:
-
Change the description in the Description field.
-
Change the part category in the Category list.
-
Click Save.
Delete Labor on the Labor Scrubber
-
On the navigation pane, click Settings.
-
On the Settings page, under the Repair section, click Repair Preferences.
-
On the Repair Preferences page, click the Scrubbers tab.
-
Click the Labor tab.
-
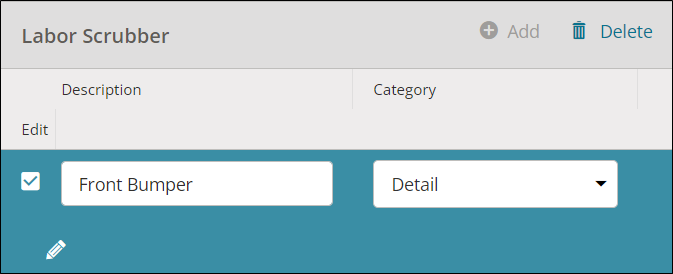
Select the check box next to the labor you want to delete.
-
Click Delete.
-
Click Delete at the prompt.
-
Click Save.
Related topics