Order Parts and Generate Parts List in ShopPak
Generate a parts list document after you complete your estimate. The parts list document includes part descriptions, quantity, and estimated prices from your estimate. You can email the parts list as an order directly from Mitchell Cloud Estimating. You can also print the parts list document or save it to your computer for reference.
Tip: When you send an order via email, the parts list is automatically generated for you
Note: ShopPak allows for parts to be ordered or cancelled. You cannot use ShopPak to return parts or mark as received. These feature are available in Mitchell Cloud Repair. Contact your Account Manager for details about Mitchell Cloud Repair.
How to
-
Add repair lines to your estimate.
-
Do one of the following:
-
From the Estimate Editor or the Split View in an estimate, select Order Parts near the top of the page. (If you are on the Parts page, click Estimate or Split View in the navigation pane). The Parts Order page appears.
-
From the Job Overview page, select the Parts Order/Parts Management card.
- Select the supplier from the Supplier list.
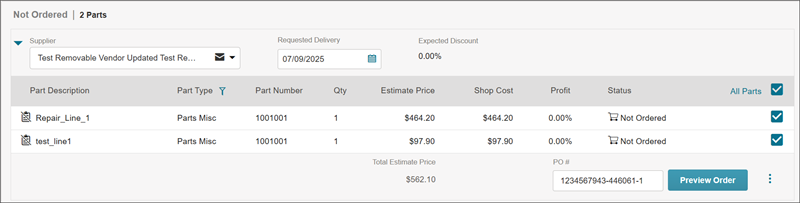
- Verify the delivery date in the Requested Delivery field. Select
 in the Requested Delivery field to select a new date.
 - All the parts listed are selected by default. Clear the check boxes next to any parts you do not want to order.
Tip: Select Deselect to clear all check boxes. You can also select Select All to select all check boxes or clear all check boxes.
- Review the system generated purchase order number in the PO# field. Modify the number as needed (optional).
- Review your selections, and then select Preview Order.
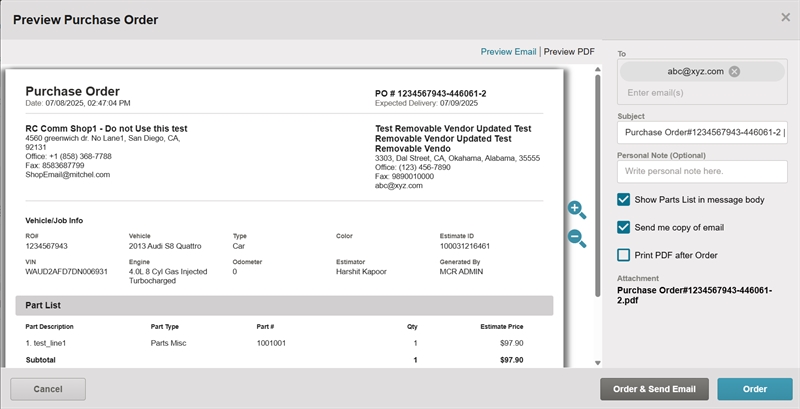
- In the Preview Purchase Order window, change your view with the following options at any time:
- Select Preview Email to review email content.
- Select Preview PDF to review the purchase order PDF.
-
In the Preview Purchase Order window, review and modify email fields as needed:
-
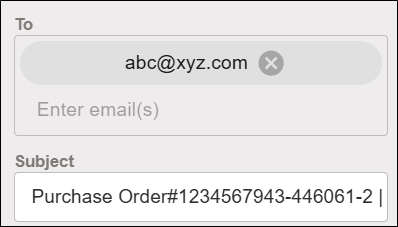
Review the To field. Email orders are sent to this address. Enter an additional email if needed. To change the default email address, select X next to the address and then enter a new email.
-
Review the Subject field. This field auto-populates with the purchase order number. Adjust the content as needed.
-
In the Preview Purchase Order window, enter content in the Personal Note (Optional) field as needed. Use this field to send a note to email recipients or to add a note to the PDF purchase order. This content appears at the top of the email message and at the bottom of the PDF invoice.
-
Clear or select any of the following check boxes (optional):
-
Show Parts List in message body: Show or hide parts in the body of the email. The PDF always shows the parts list.
-
Send me a copy of email: Send a copy of the email to yourself. Your email appears in the CC field in the Email Preview.
-
Print PDF after Order: Print a PDF copy. The PDF Purchase order appears in the Print preview window. Use the prompts to print or save the PDF.
- Select one of the following:
- Order & Send Email: Send the order by email and send to additional recipients.
- Order: Mark parts as ordered. Emails are not sent with this option.
Note: Once at least one order is placed, a breakdown of the total parts ordered shows on the Parts card. After the parts are ordered, they appear at the bottom section of the Parts Order page.
- Select View Estimate to return to the estimate or Job Overview to return to the Job Overview page.
Note: When you order parts from an opportunity, the opportunity is automatically converted to a repair order. Your UserID must include permissions to convert an opportunity to a repair order.
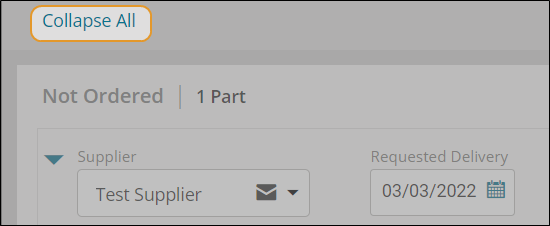
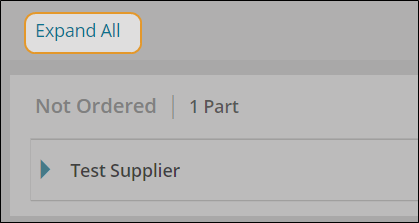
Expand or collapse all parts on the Parts Order page to view a list of orders more easily. When you exit the Parts Order page, orders are set to expanded view.
-
On the Job Overview page, click the Parts Ordered card.
-
Do one of the following:
-
Click Collapse All to hide order details and show a list of orders.
-
Click Expand All to show all order details and parts.
Expand or collapse order details by supplier on the Parts Order page to view orders more easily. When you exit the Parts Order page, orders are set to expanded view.
-
On the Job Overview page, click the Parts Ordered card.
-
Do one of the following:
-
Click the arrow
 next to the supplier name to hide parts for that supplier.
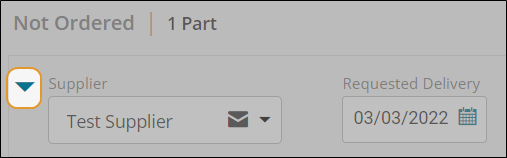
-
Click the arrow
 next to the supplier name to show parts for that supplier.
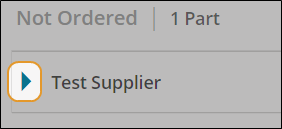
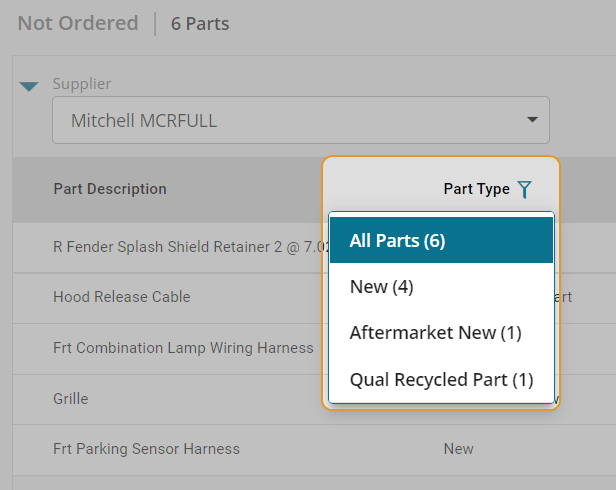
Use the Part Type filter on the Parts Order page to better view and manage Ordered and Not Ordered parts. Parts can be filtered by part types like New, Qual Recycled Part, Aftermarket New, and more.
The Parts Type filter only lists the type of parts that appear on the Parts Order page for the related job. This shortens the list in the feature to only relevant parts types added for the related job.
-
On the Job Overview page, click the Parts Order card.
-
On the Parts Order page, do one of the following:
-
In the Not Ordered section, click
 next to Part Type
 -
In the Ordered section, click
next to Part Type
-
In the Part Type Filter list, select the part type.
-
To clear the filter, click
next to Part Type, and then click All Parts.
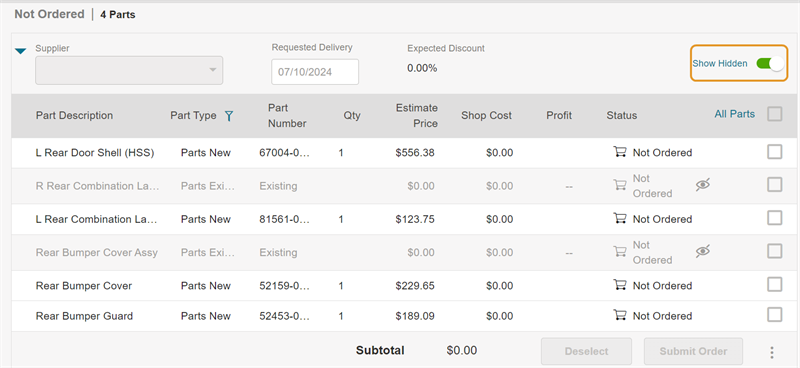
The Parts Order page excludes sublet lines and only shows part lines. Parts lines are marked as hidden if those parts lines include labor operations other than Remove and Replace (R&R). This feature makes ordering parts easier as there are no parts you need to sublet in the parts list.
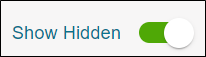
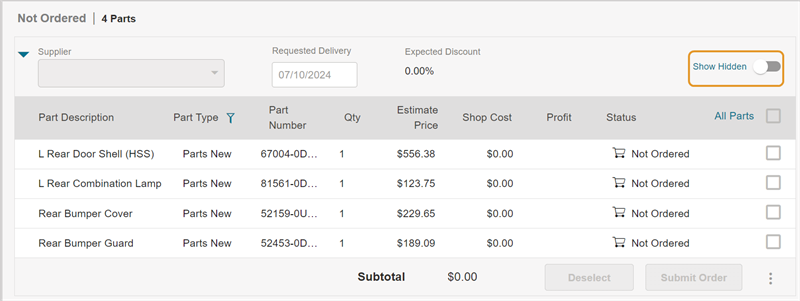
Use the Show Hidden toggle on the Parts Order page to control if non-R&R parts lines appear.
-
On the Job Overview page, select the Order Parts card.
-
On the Order Parts page, do one of the following:
-
Turn on the Show Hidden toggle to show non-R&R parts lines.
-
Turn off the Show Hidden toggle to hide non-R&R parts lines.
Note: Mitchell Cloud Repair license required: To view hidden parts lines you must be licensed for Mitchell Cloud Repair and have Manage Parts access. Contact your Sales Representative if you need to purchase this feature.
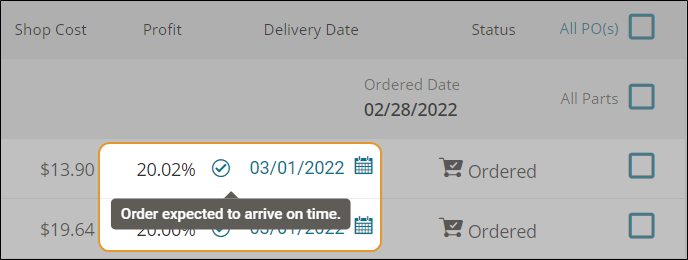
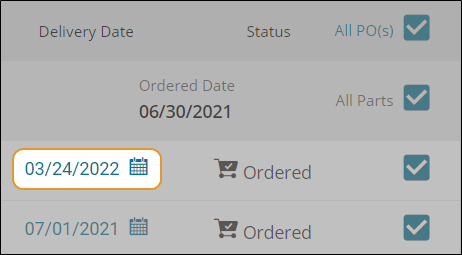
Use the Estimated delivery date to assign dates at the part level for any ordered part. This feature allows you to have different order dates on certain parts without impacting the delivery dates on the rest of your order. Part-level updates to Estimated Delivery Date are automatically sent from OEC dealers.
The following visual cues identify if your delivery dates match the OEC dealers'.
-
Check mark
 : Delivery date matches dealer’s date.
 -
No check mark: Your date may be different than the OEC dealer's date, either during order fulfillment or since order fulfillment.
-
Orange warning icon: The dealer's delivery date is later than your requested delivery date at the time of order.
Tooltips appear with descriptions when you click or hover over the icon.
-
Open a Repair Order with ordered parts.
-
On the Job Overview page, click the Parts Order card.
-
In the Ordered Parts section, click the calendar icon next to the delivery date.
-
Select a new date in the Calendar window.
-
Click Submit Order.
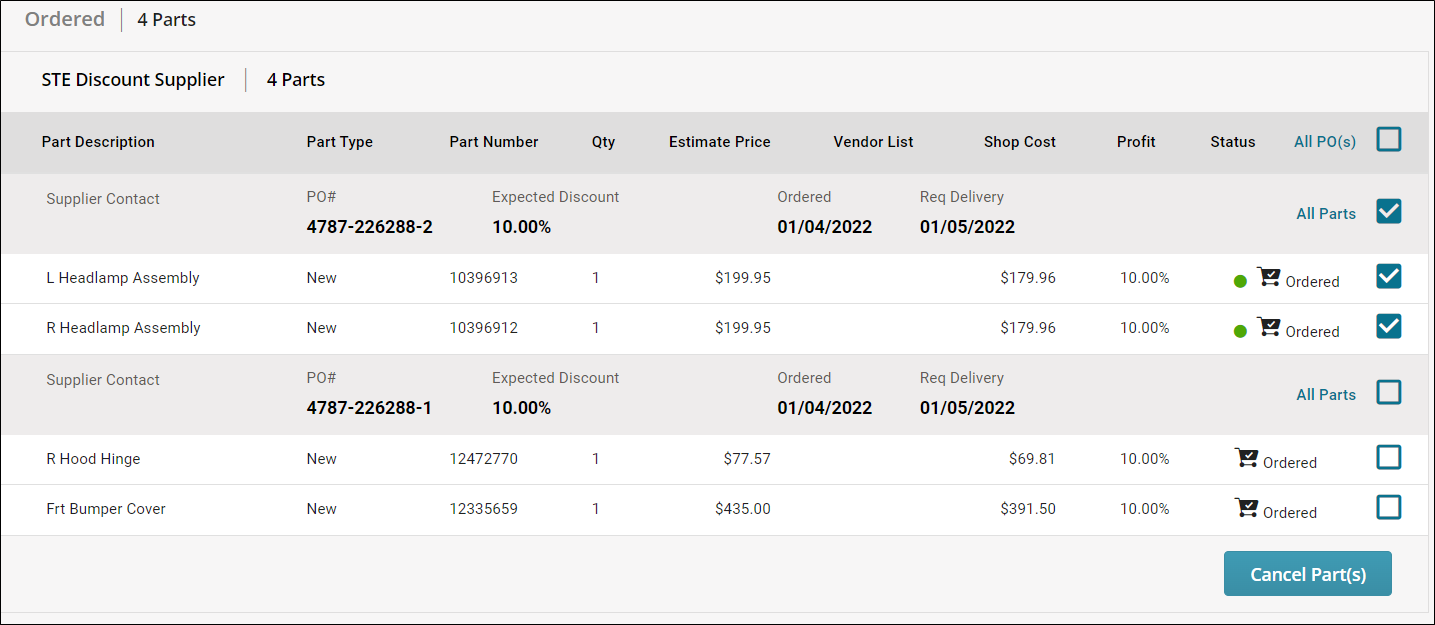
Cancel any number of parts within a given purchase order, from any parts supplier. The parts supplier receives an email with your cancelled order. The email includes a PDF of the cancelled parts with the email. Parts can be re-ordered from the same or different parts supplier.
-
On the Job Overview page, click the Parts Ordered card.
-
On the Parts Order page, do one of the following:
-
Click the check box next to All Parts to cancel all parts in the order.
-
Click the check box next to the specific part you want to cancel.
-
Click the check box next to All PO(s) to cancel all orders for all previous orders for this vehicle.
-
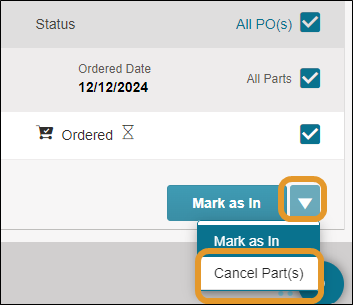
Select the arrow next to Mark as In, and then select Cancel Part(s).
-
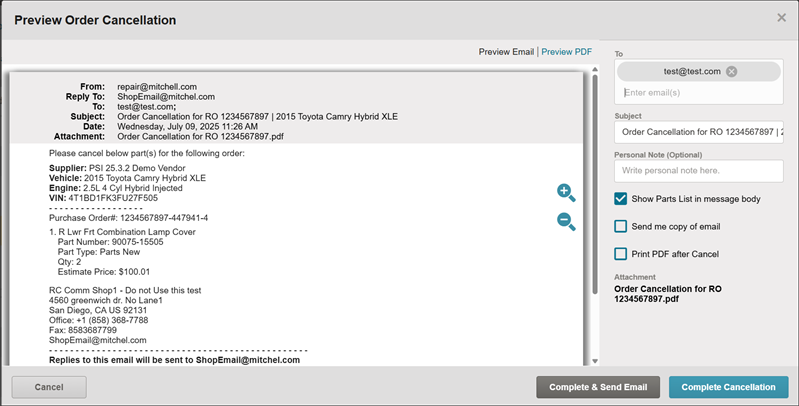
Review the cancellation information in the Preview Cancellation Email window.
-
Do any of the following optional steps:
-
Add additional email recipients in the To field if needed.
-
Modify the email subject in the Subject field if needed.
-
Enter a reason for the cancellation in the Personal Note (Optional) field if needed. Text entered here appears at the top of your cancellation email.
-
Click the check box next to Send Me Copy Of Email to copy yourself on the email.
-
Click Submit Cancel. Cancelled parts appear in the Not Ordered section on the Parts Order page if you need to reorder cancelled parts.
Cancel any number of parts within a given purchase order, from any parts supplier. The parts supplier receives an email with your cancelled order. The email includes a PDF of the cancelled parts with the email. Parts can be re-ordered from the same or different parts supplier.
-
From the Job Overview page, select the Parts Order/Parts Management card.
-
On the Parts Order page, scroll down to the Ordered Parts section as needed.
-
On the Parts Order page, do one of the following:
-
Click the check box next to All Parts to cancel all parts in the order.
-
Click the check box next to the specific part you want to cancel.
-
Click the check box next to All PO(s) to cancel all orders for all previous orders for this vehicle.
-
Select the arrow at the bottom of the Ordered Part section, and then select Cancel Part(s).
- In the Preview Order Cancellation window, change your view with the following options at any time:
- Select Preview Email to review email content.
- Select Preview PDF to review the purchase order PDF.
-
In the Preview Order Cancellation window, review and modify email fields as needed:
-
Review the To field. Email cancellations are sent to this address. Enter an additional email if needed. To change the default email address, select X next to the address and then enter a new email.
-
Review the Subject field. This field auto-populates with the purchase order number. Adjust the content as needed.
-
In the Preview Order Cancellation window, enter content in the Personal Note (Optional) field as needed. Use this field to send a note to email recipients or to add a note to the PDF purchase order. This content appears at the top of the email message and at the bottom of the PDF invoice.
-
Clear or select any of the following check boxes (optional):
-
Show Parts List in message body: Show or hide parts in the body of the email. The PDF always shows the parts list.
-
Send me a copy of email: Send a copy of the email to yourself. Your email appears in the CC field in the Email Preview.
-
Print PDF after Cancel: Print a PDF copy. The PDF cancellation appears in the Print preview window. Use the prompts to print or save the PDF.
- Select one of the following:
- Complete & Send Email: Cancel the order by email and send to additional recipients.
- Complete Cancellation: Remove parts from Ordered section and move to Not Ordered section. Emails are not sent with this option.
-
Cancelled parts appear in the Not Ordered section on the Parts Order page. Select Job Overview at the top of the page to return to the Job Overview page.
Download or Print of PDF of the following on the Parts Management Page:
-
Purchase Order
-
Return Slip
-
Parts List
If multiple options are available, one PDF is generated with headings separating each order status.
Note: Download and print options may vary. If orders or returns were not been generated, Purchase Orders and Return Slips are not available.
-
On the Job Overview page, select the Parts card.
-
(Optional) If you only want selected parts to appear on the PDF for any list, select the check boxes next to the parts.
-
On the Parts Management page, select Print/Share at the top of the page.
-
In the Print/Share list, select Print/Download.
-
Do one of the following in the Document Type section on the Preview Document window:
-
Only Selected Parts: Generate a parts list PDF for only selected parts on the Parts Management Page including Not Ordered, Ordered, Received, and Returned. Be sure to select the parts you want before selecting this option.
-
Only Not Ordered Parts: Generate a parts list PDF for parts not yet ordered.
-
All Parts: Generate a parts list PDF for parts on the Parts Management page regardless of order status.
-
Purchase Order (If available): Generate a purchase order of ordered parts. Select a specific purchase order in the Purchase Order # list.
-
Return Slip (If available): Generate a return slip of all returns. Select a specific Return Slip in the Return Invoice # list.
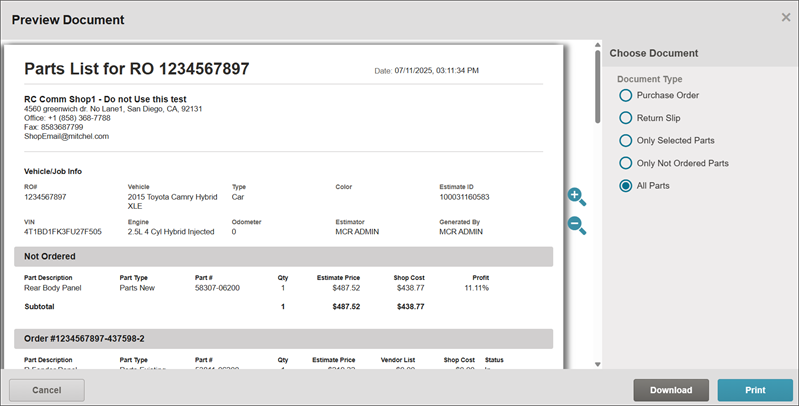
-
Do one of the following:
-
Select Download: The PDF is sent to your downloads folder on your local drive.
-
Select Print: The PDF opens in the Print preview window. Follow prompts to print or save the PDF.
Email any of the following on the Parts Management Page to any recipient:
-
Purchase Order
-
Return Slip
-
Parts List
The email automatically includes a PDF copy of your selections.
If multiple options are available, one an email PDF is generated with headings separating each order status.
Note: Download and print options may vary. If orders or returns were not been generated, Purchase Orders and Return Slips are not available.
-
On the Job Overview page, select the Parts card.
-
(Optional) If you only want selected parts to appear on the Email for any list, select the check boxes next to the parts.
-
On the Parts Management page, select Print/Share at the top of the page.
-
In the Print/Share list, select Email.
- In the Preview Email window, change your view with the following options at any time:
- Select Preview Email to review email content.
- Select Preview PDF to review the purchase order PDF.
-
Do one of the following in the Document Type section on the Preview Document window:
-
Only Selected Parts: Generate a parts list PDF for only selected parts on the Parts Management Page including Not Ordered, Ordered, Received, and Returned. Be sure to select the parts you want before selecting this option.
-
Only Not Ordered Parts: Generate a parts list PDF for parts not yet ordered.
-
All Parts: Generate a parts list PDF for parts on the Parts Management page regardless of order status.
-
Purchase Order (If available): Generate a purchase order of ordered parts. Select a specific purchase order in the Purchase Order # list.
-
Return Slip (If available): Generate a return slip of all returns. Select a specific Return Slip in the Return Invoice # list.
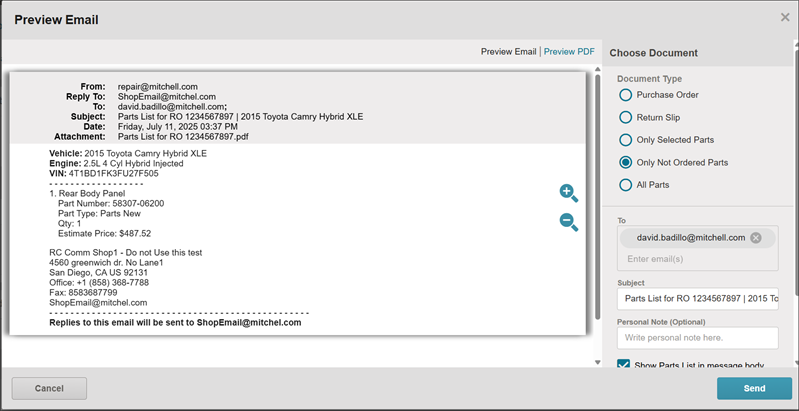
-
In the Preview Email window, review and modify email fields as needed:
-
Enter the recipient email in the To field. Enter an additional email if needed.
-
Review the Subject field. This field auto-populates with the purchase order number. Adjust the content as needed.
-
In the Preview Email window, enter content in the Personal Note (Optional) field as needed. Use this field to send a note to email recipients or to add a note to the PDF purchase order. This content appears at the top of the email message and at the bottom of the PDF invoice.
-
Clear or select any of the following check boxes (optional):
-
Show Parts List in message body: Show or hide parts in the body of the email. The PDF always shows the parts list.
-
Send me a copy of email: Send a copy of the email to yourself. Your email appears in the CCfield in the Email Preview.
-
Select Send.