Create A New Assignment
Use WorkCenter to create a new assignment.
Note: If the Claim-Suffix number already exists in the system, you can import the existing information. This saves you from having to re-enter all the data. See Import an Existing Assignment for more information.
How To
-
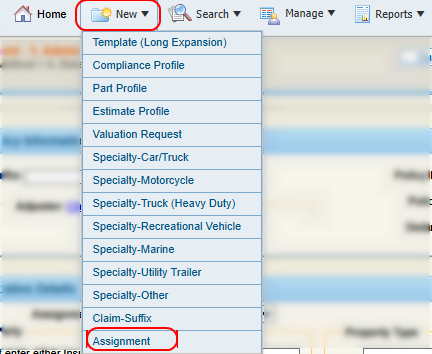
On the New menu in the navigation bar, select Assignment.
-
On the New Assignment page, enter the Claim-Suffix number.
Note: You can save an assignment after you enter the claim-suffix number, but you must complete other required information before you can send the assignment.
-
Select
 to expand the Claim/Policy Information section and complete the necessary information.
 -
Select
to expand the Administrative Details section and complete the necessary information. -
Select
to expand the Required Expertise section and complete the necessary information. Select the check box(es) next to any special appraisal skill(s) required for this assignment. This information helps identify qualified resources. -
Select Save & Continue.
-
Select
to expand the Loss Evaluation section and complete the necessary information. -
Select Save & Continue.
Note: The system will recommend a Method of Inspection based on the Loss Evaluation Results.
-
In the Inspection Method section, select an inspection method from the Method Options list and complete the required information in the section, including choosing a resource for the assignment if necessary.
-
Do one of the following to select an appraisal resource:
-
Select the check box next to Defer Resource Selection to and select a Dispatch Center from the list.
-
Use the recommended source.
-
Use Resource Lookup to find and select a resource.
-
-
Select Save & Continue.
-
Select
to expand the Assignment Details section and complete the necessary information. -
Select
to expand the Notes section and enter any desired notes.Tip: Include the VIN or login credentials in the Notes section when sending assignments to vendors outside your network or DRP so that they can access the assignment in WorkCenter.
-
Do one of the following to save your assignment:
Tip: To send an assignment to someone outside of your network or DRP (Direct Repair Program), choose Non-Network Shop as your MOI (Method of Inspection) when creating and sending an assignment.
-
Select Save to save your information and continue working.
-
Select Save & Send to send the assignment to the appraisal resource once all necessary information is complete.
-
Select Save & Close to save your information and close out of the assignment.
Reference
Required information is indicated by a red asterisk (*).
| Name | Description |
|---|---|
| Claim-Suffix * |
Enter the claim number and suffix for the assignment. This is the only required information in this section. |
| Import | Click to search for the claim-suffix number. If a match is found, any information in the Administrative Details section will be overwritten with this imported information. To undo any of these, click Undo in the confirmation message at the top of the window. |
| Choose Adjuster/Adjuster |
Select Choose Adjuster or select Select |
| Policy Number | The policy number associated with this claim-suffix. |
| Deductible | The deductible amount associated with the policy. Deductibles of up to six digits are allowed, e.g., 999999.99. |
| Deductible status list | Select Unknown, Waived, Not Waived, or None. |
Required information is indicated by a red asterisk (*).
| Name | Description |
|---|---|
| Claim Party |
These tabs contain the contact information for the various parties associated with the claim-suffix:
You must enter the contact information for the Insured or the Claimant before you can send the assignment. |
| Set as Primary Contact | Select the check box on the Insured, Claimant, or Owner tab to make that party the primary contact for the assignment. |
| Coverage Type of Loss * |
Select the type of loss (e.g., collision, fire, theft) from the list. |
| Date of Loss * | Enter the date of loss or
select  to select the date from the calendar. You can enter a loss date that is older than five years, but you cannot enter a future date. to select the date from the calendar. You can enter a loss date that is older than five years, but you cannot enter a future date. |
| Date Reported | Enter the date the loss was reported in
the text box or click to select the date from the calendar. You can enter a loss date that is older than five years, but you cannot enter a future date. |
| Property Type |
Select the type of property. |
| Property Description | If the Property Type is other than Motor Vehicle (the default), enter information to describe the selected property type. |
| Property Address | If the Property Type is other than Motor Vehicle (the default), select the Same as or Other option as needed. |
| VIN | If you have the Vehicle Identification Number (VIN), enter it in the spaces provided, and select Decode VIN. |
| Decode VIN | Select Decode VIN to decode the VIN and complete the vehicle description fields based on the Vehicle Identification Number. |
| VIN Not Available | Select this option if you do not have the Vehicle Identification Number. Then, complete the description fields in order. |
| Vehicle Type |
Select the type of vehicle from the list.
|
| Year | Select the year the vehicle was manufactured. |
| Make | Select the manufacturer of the vehicle. |
| Model | Select the model of the vehicle. |
| Sub-Model | Select the sub-model of the vehicle. |
| Body Style | Select the body style of the vehicle. |
| Engine | Select the type of engine used in the vehicle. |
| Transmission | Select the type of transmission used in the vehicle. |
| Drive Train | Select the drive train used in the vehicle. |
| Fuel Type | Select the vehicle's fuel type. |
| License Plate |
Enter the vehicle license plate number, the state/province where the vehicle is registered. |
| Exp. | Select the registration tag expiration month and year from the lists. |
| Exterior Color |
Select the color of the vehicle from the list. |
| Mileage (in miles) | Enter the odometer reading or select True Mileage Unknown. |
| Drivable | Select Yes or No . |
| Primary POI | Select the Primary Point Of Impact from the list. |
| Secondary POI(s) | Select any Secondary Point(s) Of Impact from the list. To select more than one Secondary POI from the list, press the Ctrl key on your computer keyboard while selecting the item. |
| Damage Description | Enter any notes that may explain the cause or details of the damage. |
| Vehicle Location |
The ZIP/postal code is used to search for nearby resources. Select one of the following:
|
| Name | Description |
|---|---|
| Question/Answer |
Answer the prepared set of questions for the assignment based on the type of vehicle and the reported damage. |
| Evaluate | Select Evaluate after completing the questions to view the Loss Evaluation Results. |
| Loss Evaluation Results | View the results of the loss evaluation. |
| Name | Description |
|---|---|
| Method Options |
The system will recommend a Method of Inspection based on the Loss Evaluation Results, but you also can select a Method of Inspection from the list of options. |
| Resource Lookup | If the system does not recommend a resource, select Resource Lookup to search for a resource. |
| Defer Resource Selection to Dispatch Center | Select the check box to let a Dispatch Center assign the resource. Select your preferred center from the list. This option is not available for all inspection methods. |
| Name | Description |
|---|---|
| Appraisal Resource |
The resource selected in the Inspection Method section. |
| Secondary Notification | Select the check box next to the desired method of notifying the appraisal resource. |
| Assignment Type | Select the type of assignment from the list. |
| Place on Hold | If you use the Dispatch Scheduling Board, you can place the assignment on hold. Placing an assignment on hold prevents it from being scheduled by the Scheduling Engine, and it cannot be dispatched. |
| Urgency | Select Standard, Elevated, or High from the list. |
| Assignment Duration | Select the estimated assignment duration from the list. |
| Customer Schedule Preference: Day | Select Any Day or Specific Day from the list. If you select Specific Day, enter the date or select to select the date from the calendar. |
| Customer Schedule Preference: Time | Select Any Time, Morning, or Afternoon from the list. |
| Included Artifacts | If photos (or other attachments) are part of the claim, select those files here to send them. |
| Notes | Enter any additional information to help the appraiser complete the assignment. |
| Name | Description |
|---|---|
| Use Insured/Claimant/Owner Address |
A location selection option appears for each contact address you completed in the Administrative Details section. If the vehicle is located at one of these addresses, select the appropriate location to complete the fields with the correct address. |
| Choose Shop | If the vehicle is located at a shop, select Choose Shop or select  to open the Resource Lookup window and select a shop. The address of the selected shop completes the address fields in this section. to open the Resource Lookup window and select a shop. The address of the selected shop completes the address fields in this section. |
| Address information | Complete the address information before you can send the assignment. |
| Validate |
Select to validate the address (A complete address is required). When the address is validated, maps and directions to the resource and/or location are available. |
| Location Type | This field shows where the inspection will occur. It automatically populates based on your selection in the Inspection Method field. |
| Location Name | Enter the name of the location. |
| Travel Required | Select Yes or No . |